posted by Dave Arnold
Sous-Vide cooking is any cooking that involves a vacuum bag (as opposed to low temperature cooking, which is all about temperature control, and doesn’t necessarily involve a vacuum). For a post on our sous-vide class, see here. Soon (i.e., if we ever get around to it) we hope to post a sous-vide/low temp primer.
One aspect of sous-vide cooking that doesn’t get much attention is how the vacuum machine affects the texture of meats. Most people assume that the level of vacuum on a piece of protein, or how much air you remove, doesn’t matter. It turns out nothing could be further from the truth.
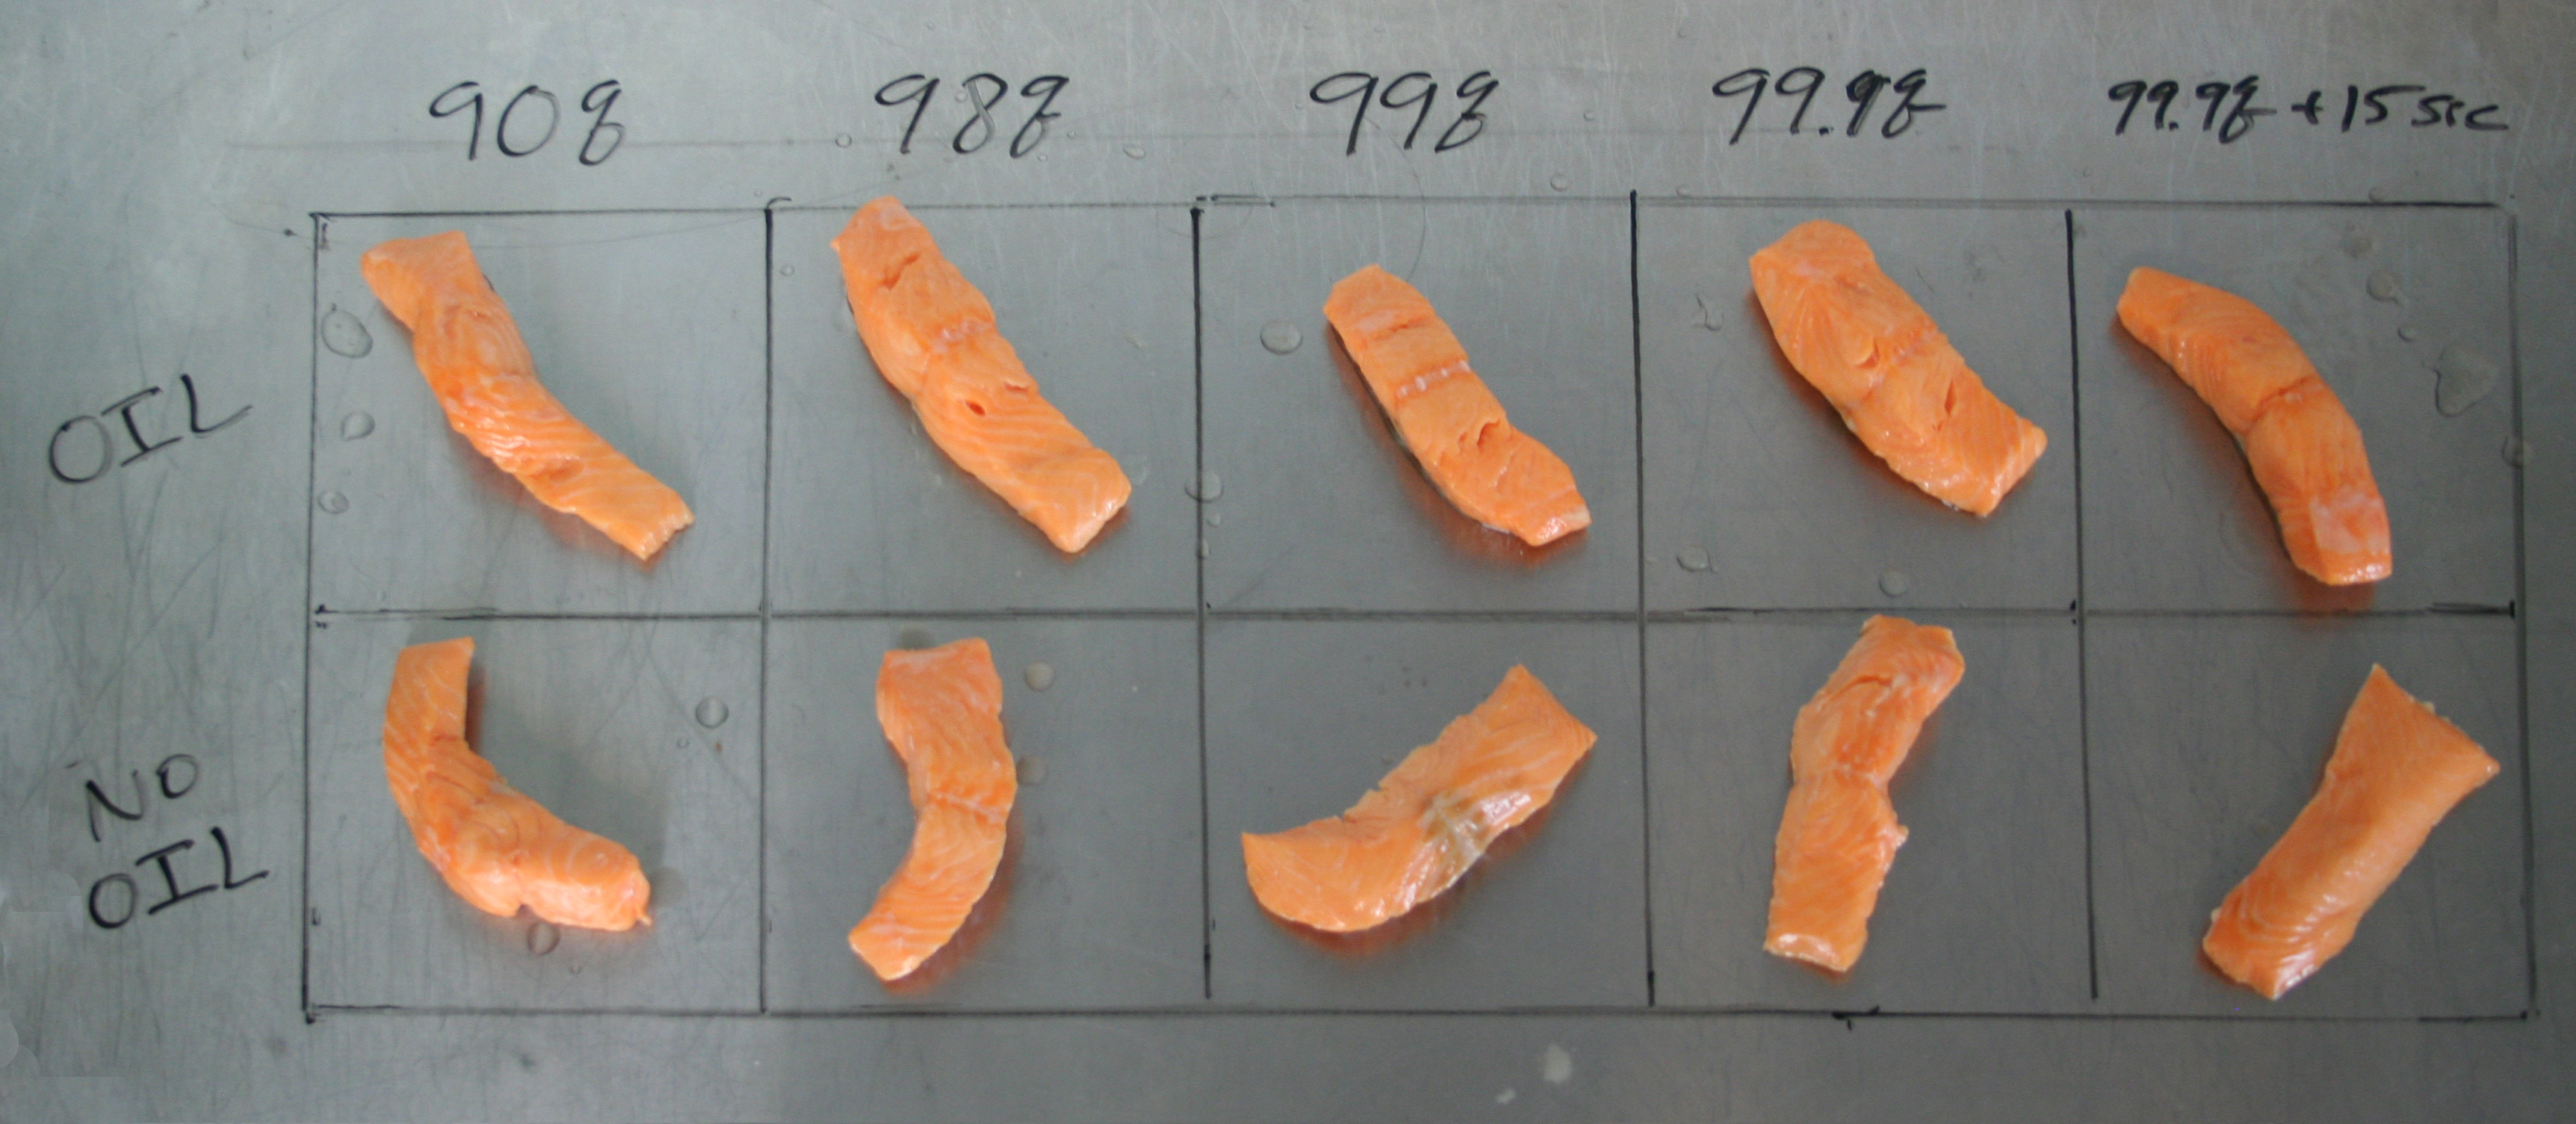
To test this, we bagged Tasmanian ocean trout and chicken breast, with and without oil, and rib-eye steak with oil at 90%, 98%, 99%, and 99.9% vacuum and one more at 99.9% vacuum plus an extra 15 seconds of air extraction. All bags were the same size, all were cooked at the same time with the same amount of oil. The fish was cooked to 48°C, the chicken to 63°C, and the steak to 55.5°C. The different muscles in the rib-eye were separated to see if they tasted different. Here are the pictures and results:
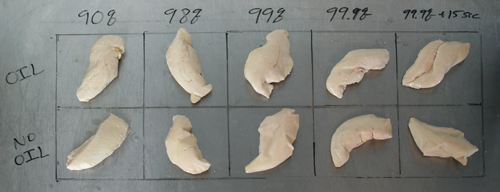
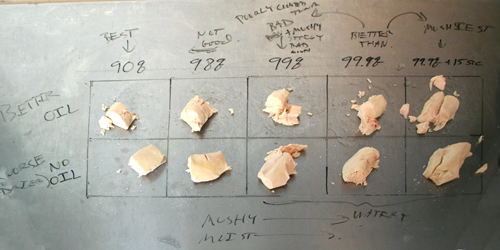
Chicken texture changes dramatically as the amount of vacuum is increased. In every case, the oil packed chicken was preferred to the no-oil chicken because it had a better mouth feel. By far, the 90% vacuum chicken was the best. As the vacuum level increased, the chicken oddly became wetter, but with a drier finish in the mouth after chewing, and seemed mushy. The 99% had a particularly bad texture, mushy but not moist. The 99.9%+ was the most overall unpleasant, because of the overly wet meat with the dry finish in the mouth. Bizarre.
Fish is even more dramatic. We all preferred the 90% fish in oil. The 99.9%+15 seconds was inedible and mushy—completely useless. Just like the high vacuum chicken it starts too wet and ends dry. There was a big difference between 90% and 98%, a medium difference between 98% and 99%, and a big difference between 99% and 99.9%. Lower vacuum was better in every case. In the picture of the cut-up fish you can see the difference in texture. We put some pieces in a dissecting microscope to show the structure of the fibers and you can see the 90% fish has much better structure. The 99.9%+ fish is wet, but the fibers don’t look right.

90% vacuum in oil on left, 99.9% vacuum plus 15 seconds no oil on right
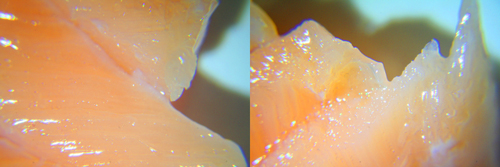
90% vacuum in oil on left, 99.9% vacuum plus 15 seconds no oil on right
The meat fared better. All the rib-eye was judged good. There were differences, but they were slight. Once again, the 99.9% + 15 seconds was a bit mushier than the rest, but not terrible. Everyone still preferred the 90% meat the best.
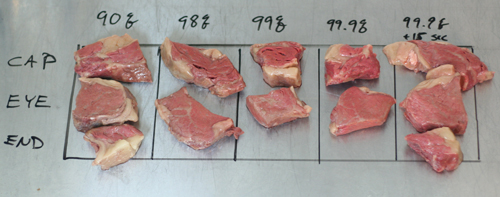
Rib-eye

This was a great experiment. This proves a great point that only a few great books explain about vacuum sealing. Especially cooking fish. Who would honestly vacuum that on high? Well, I have met a few here at the CIA. Clearly 99 and 99.9% are not the best choices with anything, but with fish it is the equivalent of placing a piece of fish between 2 pieces of plastic wrap and beating it with a mallet. Nice and tenderized!
Thanks for this one Dave, not boring at all!
Dave – this is not boring at all! Thank you so much for taking the time to document this – it’s so helpful.
Relatedly I’m not sure that fish cooked SV at LT is actually better than when cooked well using normal technique. Meat is for sure, but for me and others the texture can just feel wrong and lacking in savour. Any thoughts?
I wonder how things would come out if you were to add one more sample of each that had been bagged in a simple FoodSaver-type edge-sealing machine. . .
Very enlightening, thanks. Excuse my ignorance, but could you please explain how the precent vacuum is defined? (i.e. 90% vacuum)
Unfortunately, the Minipack vacuum machine we use measures in percent vacuum, as opposed to millibar (the way Multivac machines do). The company told me, however, that you can do a straight conversion. For instance, 90 percent vacuum would mean 10 percent of atmospheric pressure, or 1013*.1=101 millibar (there are 1013 millibars average at sea level). 98 percent vacuum would be 1013*(1-.98)= 20 millibar. What is weird is that anything over 99 percent vacuum (10 millibar) is really only measured by time. I know this because I can trick the machine into thinking it has reached 99 percent vacuum, vent the machine to atmospheric, and it still says it gets to 99.9 percent!
Thanks a lot for this post. Your experiment perfectly illustrates that individuals with their home vacuum machine can cook sous vide. The common idea that you need expensive vacuum machine for sous vide cookery is flying away!
Jean-François
I agree with Jean-François. As most home vacuum machines produce 80% vacuum at best (except the more expensive Lava machines), it would be interesting to compare the organoleptic properties of fish / poultry / meat cooked under 70% – 80% 90% vacuum. My antique MagicVac does just 72% vacuum. To find out how much vacuum your home machine achieves, see http://sousvide.wikia.com/wiki/Find_out_how_strong_a_vacuum_your_machine_produces .
Pedro
I’d be curious to know as well. I’ll see if I can do a test.
I have come to notice after much testing of these systems that the product might last a lot longer but it neve the same as having it then and there ..
Dave,
Thank you.
Best to you and Marc.
I got Under Pressure and The Big Fat Duck Cookbook and, although they do not explain why (strange if you think about it), they vacuum pack meat, fish and vegetables under a range of pressure levels. They don’t simply state: ‘vacuum pack it and cook it’.
Hello David, I am about to get into the mysterious world of sous vide, but as an amateur home cook I cannot afford a professional vacuum machine. I was wondering whether you have done the test using a home machine, or an 80% pressure as most achieve. Thanks, keep up the amazing work
Hi Elias,
I have a foodsaver at home but rarely use it. It ends up re-sealing my potato chip bags. Instead I use ziploc bags for everything at home. 90% of the work a cook wants to do can be achieved without a vacuum. The exceptions are: vacuum infusion, protection from oxidation, rapid marination, vacuum expansion, de-aeration, and a few others. The circulator, however, is a must. Here a partial list of ways to get around using a vac: ziplocs (double seal, freezer type without the sliding do-dad), plastic wrap (watertight roulades and “cannon balls”), circulating in stock or broth, circulating in oil, etc. In our opinion, many foods, as this post shows, benefit from minimal vacuum anyway. As a follow up to this post, some people do prefer the texture of hard vac’ed fish and chicken (we tasted them in our last sous vide class). We don’t. A further advantage to using ziplocs vs vacuum is that all foods going into the vacuum must be cold. This is even more of a pain in the butt at home than at work. Ziplocs can be packed hot.
Hope this is useful,
Dave
Thanks Dave, this is great help. I have a circulator (got it second hand from a closing down restaurant). I will use ziplocks, I guess I need to suck out as much air as possible? Thanks again, keep up the amazing work.
Howdy Elias,
Pretty soon we’ll put up a low temp primer including our ziploc tips. Thanks for reading and enjoy your circulator.
hi Elias- it’s very easy to use ziplocks for cooking in a waterbath – the easiest way to get all the air out (that I’ve found, anyway) is to fill a big pot with cold water (or your sink), then submerge the filled bag up to the zipper – the water will push out most of the air… sometimes it requires a little jiggling to get all the air out – then zip and remove from the water.
Yep, that’s what we do too.
That is a very good idea! I just sucked the air out with a straw and zipped, which worked great, but I guess this method is a bit easier. first try with beef short ribs was brilliant, my wife that gave me a lot of hassle for spending the money for the circulator admitted that it might be worth it, as she loved the ribs. Maybe not having to clean any pots or the oven might have something to do with it as well
Thank you Dave and Kenneth, your help much appreciated
See Modernist Cuisine by Nathan Myhrvold et al, page 2•213: “Boiling, not Crushing”:
at 90% vacuum water boils at about 45°C, at 98% vacuum water boils at 15°C, and at 99.9% vacuum it boils even below 0°C.
Quote: the expanding steam does a lot of damage to the food ….. cells rupture and are pushed aside to create chammels, drying the food and damaging its texture.
Hello PedroG,
I have discussed that with Nathan but don’t believe it. First, it actually takes a long time to boil water at 0 degrees C in a vacuum machine –a lot longer than it takes to harm food. Assuming your food has a water activity of 1 (which it doesn’t, it is less), and it is 4 Degrees C, it won’t start boiling till the pressure reaches around 10 millibar, which is about 99.1% vacuum. A little known secret of vacuum machines like the minipack is that once they go over 99%, they aren’t measuring pressure anymore (because their sensors are inaccurate below about 8-10 millibar), they just go on a timer. Those last couple of millibar can be difficult to achieve –especially if your oil isn’t in good shape. Not that boiling doesn’t ruin food! I have always taught that the boiling caused by vacuuming food too warm is damaging, but something else is happening here. The phenomenon of vacuum ruining texture isn’t, at base, a vapor pressure problem. Proof: Take three identical pieces of chicken, put one in a Ziploc, and bag the other two at 99.9% vacuum. Now remove one of the chicken pieces from its vacuum bag and put it in a ziploc. Cook all three. What you will find is that the two pieces of chicken cooked in the ziploc taste identical –even though one has been vacuumed, whereas the texture of the one COOKED under vacuum is bad. If the vacuum was, in fact, destroying the texture by cell rupture/boiling/etc/ then un-vac’ing and cooking the meat in ziploc shouldn’t save it. Something deeper is afoot.
Hi Dave,
very good point!
Unfortunately I can’t contribute to these experiments as I have only an edge sealer.
Could it be that boiling during vacuum packaging renders the meat more susceptible to compression at cooking temperatures? Then there should be a difference between meat sealed at 99% vacuum at room temperature or sub-zero temperatures (molecular freezing point depression allows cooling below 0°C). To ensure the low temperature, vacuuming should take place in a cool-room to avoid warming the food on the steel plate in the chamber sealer. BTW consider molecular boiling point elevation of physiological liquids.
Hello PedroG,
In practice, we put our food in bags and submerge the bags in ice water prior to vacuuming, er else vacuum products straight out of the fridge. If you are luck, you have one of the Randall FX refrigerated prep stations, that keep your food at 40F while you are working. I have always assumed that boiling was bad, so I’ve never actually done the experiment of bagging two pieces of meat at the same time at two different temperatures. I’m assuming the warmer one will be worse.
I wouldn’t worry about the cold room too much unless you are bagging a lot of products. If you are bagging all day there are people who do all their prep in walk-in fridges.
Hi,
I am seeking some guidance please.
I see two affects. One is the effect of vacuum on the food itself.
The other is its effect on heating the food which is I believe the main purpose, that is to remove air which is a poor conductor of heat and get the warm water as close as possible to the food.
Imagine a cross section: warm water next to a thin film of plastic next to a layer of air next to the food. How much faster does the heat transfer across the air layer at 10, 50, 90% vacuum etc? Does it make any significant difference?
If not then there is no point in a high vacuum unless you are deliberately trying to alter the food by say sucking out air from within it and/or liquid.
Maybe a temperature probe inside food at different vacuums would indicate if the cooking time is significantly affected. Maybe this has already been done?
Any advice would be appreciated.
Regards, Don.
Hello Don,
Their are a couple of reasons to use a strong vacuum. In vegetables, you have to suck a hard vacuum to remove the air from the inside of the tissue (vegetables are typically porous). If you don’t, the air will escape into the bag and expand during cooking causing all sorts of problems. In meats that are going to be frozen you need a hard vac to prevent surface textural changes due to extraction/recrystallization of water/ice a the surface. In meats that are going to be stored a long time or reheated it is important to remove all the oxygen to prevent oxidation/rancidity/warmed over flavor. In normal cooking, the vacuum isn’t necessary. You can do almost everything with ziplocs. In fact, ziplocs bagged under water have bag-to-food contact than a 95-98% vacuum. Even so, the little bit of air (note I said little) doesn’t seem to make that much difference. The exception is creme anglaise, where removing the air with a vacuum seems to prevent overcooked egg/sulfur aromas from developing during cooking.
Hi, Dave,
PedroG, BlackP and I have been debating this point extensively, ever since I got my MVS-31X and innocently asked what the optimum vacuum settings were. BlackP said 99.9, PedroG said 90%, and let the food fight begin!
I believe there are two different issues here (at least). The first is what the optimum vacuum setting is for long -term frozen storage, and the second is what the optimum conditions are for SV cooking. Unfortunately, these may be interrelated, as your experiment seems to indicate, and indeed something deeper is afoot.
The conventional wisdom is that once you release the vacuum, the air pressure on the exterior of the bag neutralizes whatever vacuum might exist inside the bag. I’m not nearly so sure. Obviously in the case of watermelon, there is a considerable compression effect, and although meat doesn’t have vacuoles like plants do, the sudden shock (for those of us without a soft air release) might at the very least cause some bruising.
In addition, if subcutaneous boiling takes place during the vacuum stage, it might cause some of the cells to rupture, setting the stage for future leakage. Then, I believe, when the food is raised to cooking temperature while still in the bag and in an evacuated state, more leakage will occur.
One way to resolve this might be to decrease the vacuum to the point where water would not boil, even at the cooking temperature. At 60C, that would only be 70%, at least for water. What the boiling point is for meat juices is yet another question that would need to be resolved. I am assuming the boiling point is raised, but I don’t know that for a fact.
And if all this weren’t difficult enough, there is the question of whether introducing say 20% CO2 after the vacuum process would help the long term storage issues.
I think some more controlled experiments are in order, one of which should be to replicate your results, and then slice the food and photograph the edges with a high-power macro lens., which I have; or better yet a microscope, which I don’t have.
Hello Robert,
I believe this is essentially correct. Meat, with the exception of blood vessels/capillaries/interstitial spaces acts pretty much like an incompressible solid and after any initial damage or shock cause by the bag hitting/deforming the food seems unaffected. In fact, this “lack of effect” is the principle behind the repeated vacuuming of fruits when doing texture modification. The first time the bag hits the fruit the evacuated voids near the surface of the fruit are compressed. The next time you vacuum the fruit and let the bag hit again, those previously compressed voids are incompressible and the next layer of voids is compressed…and so on.
I believe this is also essentially correct. Although any rupturing should cause leakage whether or not the food remains in the bag. The effect is similar to cell rupture caused by repeated freeze-thaw cycles.
I do not believe this is true. Once the bag has equilibrated with environment, the food essentially feels no force –there is no boiling in the bag. The only exception is when foods containing internal uncrushed voids are heated, but the amount of water vapor (from boiling/evaporation) that would be required to bring the partial pressure of water in the bag up to atmospheric would be miniscule.
it would certainly enhance microbial safety. You would have to evacuate the bag prior to cooking. I’d be worried there might be some residual taste.
For me the real question is: why does the level of vacuum something is cooked under inherently affect the texture of the meat? I don’t believe it has anything to do with cell rupture/boiling (that isn’t inherent… it is temperature dependent –although the effect of texture destruction due to vacuum boiling is something I sincerely believe in). I am willing to be proven wrong on the temperature thing, but remain unconvinced.
Best,
Dave
hi dave I need help on different subject. Im trying to make a spherical margarita .Utilizing reverse spherification was wondering if u had done it before or new someone who could help me out. i keep getting too thin a membrane around the gel or if not i get too thick a membrane. any help or info would be greatly appreciated
What gel system are you using? Alginate? If so, which one and at what percentage. What calcium are you using and at what percentage?
The vacuum level dilemma with chamber sealers for sous vide cooking:
Edge sealers suck all air out of the bag before sealing, tightly fitting the bag to the food; so even with low vacuum levels, there is virtually no air left in the bag, except for some surface irregularities of the food to which the plastic may not have been snugly fitted. Maximum vacuum levels achieved by edge sealers (80-90%) will not damage food by cold boiling and/or compression.
In contrast, chamber sealers suck the air out of the bag and its surrounding, then seal, and the bag will only be fitted tightly to the food after releasing the vacuum from the chamber. To fit the bag snugly to the food, vacuum levels of 99% to 99.9% are applied. These vacuum levels may damage delicate food like fish or poultry. Reducing the vacuum level in a chamber sealer to e.g. 80% may leave some air in the bag causing floating and poor heat transmission: if the initial air volume between food and bag was e.g. 200ml, after sealing in an 80% vacuum there will be 40ml of air (that’s a jigger!) left in the bag.
If there is no edge sealer at hand for sealing delicate food, a Ziploc bag may be preferable to the chamber sealer. Another solution might be to weigh down the bag within the vacuum chamber with a rectangle cut out of a stab protection apron, so it fits as snugly as possible to the food before sealing and releasing the vacuum.
Just another idea:
Use a sealed bag of water to weigh down the bag to be sealed and eventually a second sealed bag of water below the bag to be sealed, thus displacing as much air as possible out of the bag before sealing.
You mean instead of sealing underwater?
I mean squeezing as much air as possible out of the bag to be sealed in the chamber sealer by placing it between two sealed bags of water acting as cushions, thus reducing the residual air volume when sealing at 80% vacuum.
I’d mainly agree. Ziploc and water is the easiest for me. I wish i had a sealer that could work underwater.
Hi, Dave,
I finally got around to repeating the same tests that blackp conducted, with essentially the same results:
I purchased a tray of “chicken tenders” (cut from a chicken breast to a remarkably uniform size). I then weighed and cut each one to be as close to 50 grams as my scale would allow (+ or – one gram, or 2% accuracy).
One was vacuum packed at 99.9% + 30 seconds. Another was vacuum packed at 99.9+30, then opened and repacked at 70%. A third was packed at 95%, and a fourth at 80%.
All four were cooked SV for 2 hours at 63C, immediately afterwards.
After cooking them, I opened and weighed each piece. Each weighed 46g, except for the one which was packed at 99.9% + 30 seconds, which weighed 44g.
I didn’t bother to photograph the pieces, because I couldn’t detect any visible differences at all.
As far as the organoleptic quality (taste, smell, visual appearance, mouth feel), I couldn’t tell any significant difference. To the extent that there was any, the piece that was vacuum packed at 99.9+30 tasted somewhat less dry and more juicy than the others, despite the fact that it lost 2g more in juice! Go figure!
My wife ate the remains of the test in an chicken sandwich, and liked it. I also cooked the rest of the package, put it in an ice bath until dinner, then grilled it on on my cast iron plancha and made a grilled chicken Caesar salad with roasted caperberries. Quite good!
As a result, I have to say that n my experience, at least for very short vacuum times, there doesn’t seem to be any significant difference between the different vacuum levels, and if anything, the higher vacuum settings seems to work as well or better, regardless of which way the water swirls going down the drain.
Now, would things change if we packed the same chicken pieces in the same different vacuum levels, and then froze them for say a couple of months in that condition? TBD — more research is required.
But somehow, your results and ours don’t agree with each other, and it isn’t yet obvious why.
On the CO2 issue, I’m seriously thinking about buying the gas fill adapter for my minipack MSV-31X, but I would welcome any comments from anyone about long-term taste effects.
Howdy Robert,
Interesting test. I have run the vac test many times –It is part of the sous-vide low-temperature class we teach at the FCI. We almost always get the same vacuum effects time after time. I wonder if your cooking times are so long that they are masking the effect (which would be interesting). In tests we ran for cooking turkey (http://www.cookingissues.com/2009/11/18/daves-effort-to-stop-ruining-thanksgiving/) longer cooking times tend to approximate the effect we see at high vacuums. Those pieces of chicken should cook relatively quickly –on the order of 20-30 minutes. Thoughts?