posted by Dave Arnold
Low-Temperature and Sous-Vide Primer Contents:
- Purdy Pictures: Sous-Vide and Low-Temp Charts
- I . Introduction to Low-Temperature Cooking and Sous-Vide
- **II. Low-Temperature Cooking Without a Vacuum** you are here
- III. Use and Abuse of the Vacuum Machine andVacuum Tricks
- IV. Temperature Control and Safety
- V. Cooking Meats and Poultry
- VI. Cooking Fish
- VII. Cooking Everything Else
Part II. Low-Temperature Cooking Without a Vacuum
… in which we’ll discuss preparing foods for low-temperature cooking without using a vacuum machine. We’ll look at zip-loc bags, plastic wrap, and cooking in oil/stock/humid air.
- 1. Introduction: Why You’d Want to Do Low-Temp Cooking Without a Vacuum
- 2. Unprotected Cooking Techniques
- 3. Protected Low-Temperature Cooking
Introduction
Before We Start: A Note from New York City:
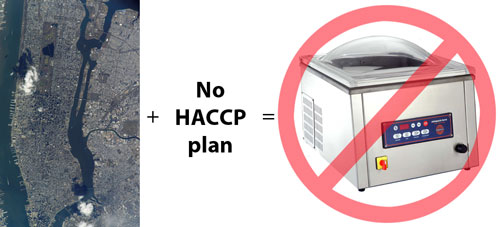
In New York City, a restaurant cannot use a vacuum machine without developing a HACCP plan. HACCP (Hazard Analysis Critical Control Points) is a system designed to ensure food safety. It was developed by large corporations who were making food for space missions –giving an astronaut food poisoning can be catastrophic. Creating your own HACCP plan (explained in the upcoming safety section of the primer), even if you don’t implement it fully, is a great way to help yourself ensure food safety. HACCP plans administered by the Board of Health, on the other hand, are a pain in the rear. They entail extra inspections, log books, lots of time, and possibly spending money on consultants. Look here for the Board of Health guidelines. Low temperature techniques that do not require a vacuum machine have a major advantage for New Yorkers: no HACCP plan required.
Even If You Don’t Cook in New York City:
While I love a commercial vacuum machine, about 90% of what a cook wants to accomplish with low temperature cooking can be achieved without a vacuum machine. When Nils was at restaurant Aquavit he did a lot of low-temperature work with a circulator, but didn’t have a vacuum machine. Back then restaurants weren’t required to have a HACCP plan; he didn’t have a commerical vacuum because they cost too much.
Today many home cooks use the Food Saver vacuum for low temp. I don’t use my Food Saver any more. I use Ziploc bags, without a vacuum. I find Ziplocs easier than the Food Saver – I don’t have to hunt down the special bags, I can easily bag sauces (a pain with the Food Saver), I can bag hot foods (foods to be vacuumed need to be cold – more on that in the next primer installment). My Food Saver has been relegated to potato-chip-bag-resealer.
To Review:
Low temperature cooking is defined as any cooking procedure where the cooking temperature is at, or close, to the desired final internal temperature. There are two requirements for low-temperature cooking:
- precise and accurate temperature control
- a cooking medium which conducts heat more efficiently and accurately than dry air. Water and water vapor are typical; oil, stock, or any other liquid will work (for more info, see Part I).
The Basics: To Pack or Not To Pack
There are two basic approaches to low temperature cooking:
- Expose the food to the cooking environment – includes cooking in temperature controlled poaching liquids, oil, 100% humid air. I call this “unprotected†low temp.
- Protect the food from the cooking environment – includes vacuum bagging (covered in the next installment of the primer), Ziploc bagging, plastic wrapping.
2. Unprotected Cooking Techniques:
You can’t cook low-temperature in dry air; for example, don’t try it in your oven. Dry air is a poor heat conductor and causes evaporative cooling at the surface of your food – making accurate temperature control impossible. 100% humid environments, like you can achieve in a combi oven, don’t conduct heat as well as straight water, but they can be very accurate. This kind of cooking is simple. Food goes into the cooker and gets pulled when it’s done; no wrapping required. The workflow is very intuitive for most cooks. But there are some disadvantages to 100% humid cooking; if you’re doing a cook-chill procedure the food isn’t protected from recontamination (it would be if it was wrapped); and during long cooking times (like several hours) the food’s surface tends to degrade.
Combi ovens and CVap ovens provide a 100% humid environment:
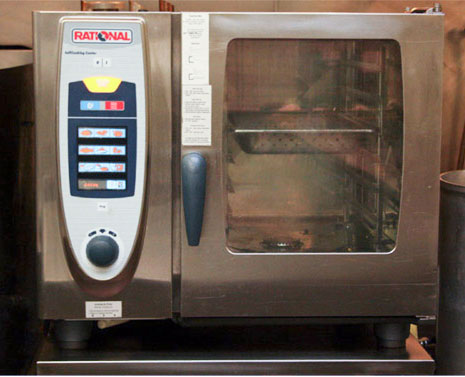
Combi ovens are combination steam/convection ovens; modern ones can operate at low temperatures. The main advantage of combi ovens: they can handle large amounts of food without getting bogged down by overloading, or by repeated opening and closing. Unfortunately, the ovens expend an enormous amount of energy to maintain this stability. Combis are also expensive and difficult to retrofit into many kitchens. And perhaps their biggest problem: they aren’t very accurate. Studies by Chris Young and Nathan Myhrvold show that while a combi oven’s average temperature can be accurate to within a couple of degrees centigrade, at any one moment it can be tens of degrees off. Combis should only be used to cook large items , like roasts, that won’t overcook in the ten minutes or so that it takes the combi to swing back and forth around its target temperature.
CVap technology was originally developed for Kentucky Fried Chicken. Colonel Sanders needed something that would hold his chicken in perfect condition; he asked his friend and fryer guru, Winston L. Shelton, for help. In response, Shelton invented CVap (Controlled Vapor) technology. CVap ovens are basically food holding cabinets with a bain marie in the bottom. Both the oven cavity and the bain marie are heated and temperature controlled. The cook can control the humidity inside the oven by adjusting the difference in temperature between the bain marie and the oven air. The core temperature of the food will not rise above the temperature of the bain marie. The surface texture of the food is controlled by the humidity of the oven air. You set the temperature of the oven air much higher than the water for crispy foods, like fried chicken, and you set it the same temperature for low temp cooking. For a detailed discussion of why the CVap works, see here.
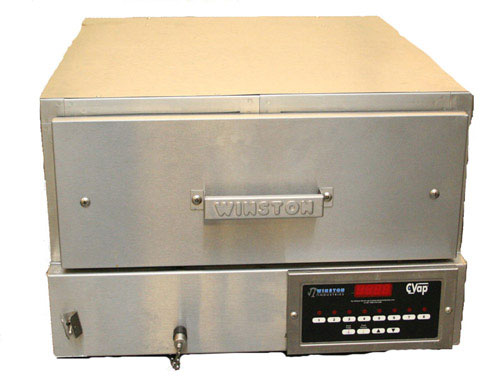
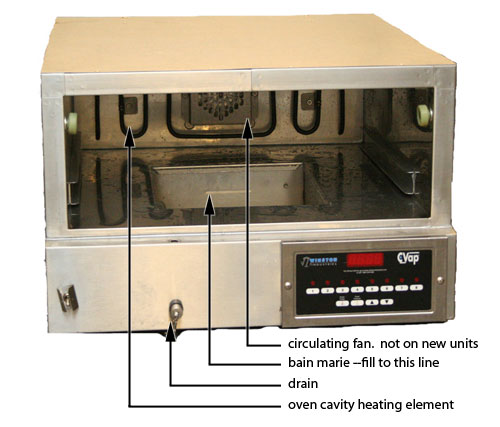
The Cvap comes in a range of sizes, is much cheaper than a combi, doesn’t require a lot of power, doesn’t require a water supply or a drain, and is extremely easy to retrofit. Many restaurants in New York City bought CVaps immediately after the Health Department instituted HAACP control for sous-vide cooking. It is difficult to get a HAACP plan approved for sous-vide fish, and it is impossible to get one approved for fish below pasteurization temperatures (which is where we usually want to cook it). Since the possibilities of low temperature fish attracted many chefs to low temperature cooking in the first place, many took up the CVap. It was basically unheard of in chef circles prior to the health department crack down. The disadvantage of the CVap: it can start sucking wind if overloaded, or if the door is frequently opened and closed.
Cooking Directly in Water/Fat/Stock/Poaching Liquid
The immersion circulator is many cooks’ instrument of choice for low temperature cooking; most cooks only use their immersion circulator with water. Take note: you can circulate any liquid you want –stock, beer, oil, duck fat, lard, apple cider, whatever. I am often asked if the circulator will be damaged by liquids other than water. Happily, the answer is No. If you ask Philip Preston from Polyscience (whose circulators we use) he will tell you the machines aren’t NSF rated for direct food contact. It isn’t because the circulators aren’t safe for direct food contact, it’s just that getting the NSF rating would cost a lot more money than it is worth. Here are the rules for unprotected cooking in the circulator:
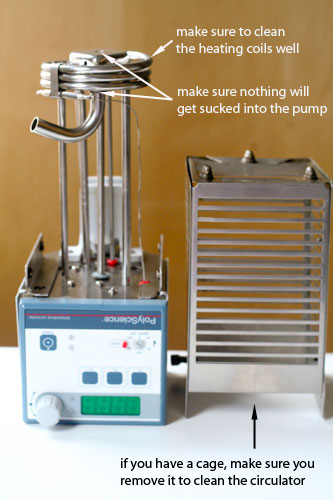
- Make sure the circulator is clean. Circulate detergent to clean it. Scrub the heating coils with a toothbrush. We use the oven cleaning tablets from our combi oven manufacturer to clean ours. Those tablets eat everything. Other people use CLR (calcium, lime, rust) remover. Do what you like, but keep those circulators clean.
- Make sure you aren’t going to suck small items into your circulator pump. Any time you add herbs, burnt wood chips, crushed lobster shells, or any other flavoring to your bath, wrap it in cheesecloth first.
- Be careful, especially with oil and fat, to get good circulation. Bad circulation = bad temperature control and could = safety problem. The cooking liquid should be moving around all sides of the food at all times.
- Never cook unprotected in a liquid that isn’t hot enough to kill bacteria. We always keep our liquids above 54.4˚C (130˚F).
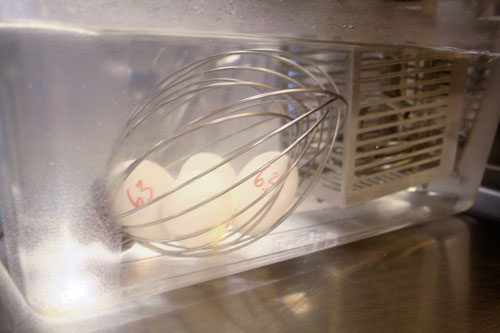
Eggs in their shells are cooked low temperature in plain water without any further protection –after all, they come pre-wrapped. Most foods will have their flavors leached out if cooked in water (that’s how broth is made) but some foods benefit from cooking in stock or other flavorful liquid. These foods are prime candidates for unprotected low temperature cooking in liquid. Fish can be cooked in a temperature -controlled court-bouillon. Ham can be cooked in temperature-controlled apple cider. Bratwurst can be poached in temperature-controlled beer. Most of the time, you are better off putting a small amount of your flavorful liquid in a bag with your food and doing protected low temperature cooking — cooking directly in the liquid requires a lot of it. Here are some cases where cooking directly in liquid makes sense:
- If you have an item too big to bag easily, like a whole ham, that could also benefit from some added moisture and some mellowing (many hams are salty)
- If you are cooking many of the same item over a period of time –like sausages:
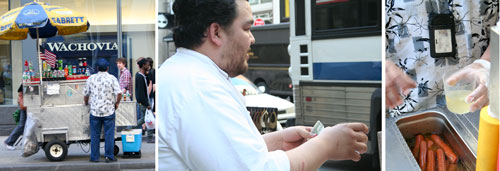
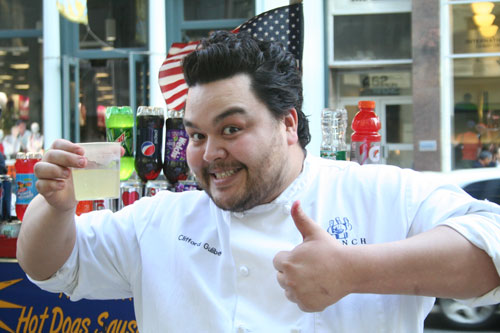
Let’s say you cook a couple hundred sausages a day. Start with a stock that complements your sausage. Use an immersion circulator to keep that stock at 60˚C (140˚F). Throw raw sausages into the stock to cook as you need them and pull out the cooked ones to finish on the grill. After a couple of hours your stock will take on a taste almost identical to your sausage. The stock will taste like liquid sausage. I verified this phenomenon by paying five bucks to drink a cup of cooking water from a New York City hot dog vendor. After your stock has reached the liquid-sausage stage it is no longer changing the flavor of your sausages. The stock and the sausages are in equilibrium. At the end of the day, throw some ice into your stock to cool it down and put it in the fridge. The next day, bring your stock back to the boil to kill bacteria and start again. If you added the right amount of ice the day before (determined by trial and error), you should be able to maintain a constant amount of stock indefinitely. In China, stocks have been continuously maintained this way for hundreds of years.
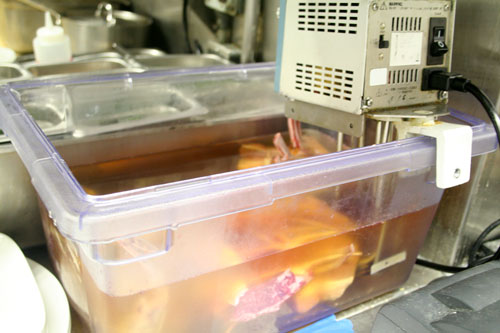
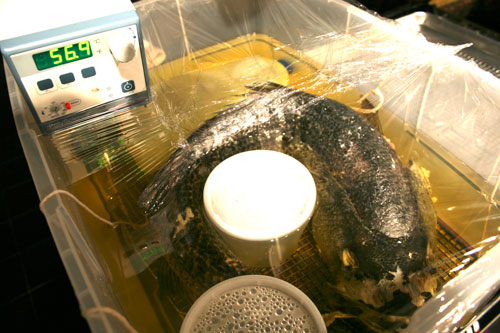
You can also cook directly in temperature controlled fat. Fat doesn’t leach the flavors out of food and often provides a beneficial unctuousness. It is expensive to fill a whole circulating bath with fat, so use this technique in circumstances like these:
- Some chefs and customers attach a stigma to cooking in plastic bags; fat poaching, however, has an aura of tradition and wholesomeness
- If you are cooking a lot of the same item, it can be convenient to cook directly in fat. No time is required for bagging. It’s much faster to pull items directly out of a fat bath than to un-bag them. The cost of the fat is less significant over a large number of items
- Very large items –like a 36 inch striped bass –can be difficult to bag, and you might not want their flavor altered by a stock. Cook them directly in oil or fat.
3. Protected Low Temperature Cooking
Most low temperature cooking work involves protecting the food from the cooking medium with some sort of impervious cover, which is almost invariably made of plastic. The advantages of protected cooking are:
- There is no loss of flavor to the cooking medium.
- There is a reduced risk of contamination.
- Different types of foods can be cooked in the same vessel at the same time.
- Protected foods are very easy to chill quickly after they are cooked.
The main disadvantages to protected cooking are the time it takes to wrap or bag the food, and some people’s trepidation about cooking in plastic.
Many people are concerned about the possibility of chemicals from plastics leaching into foods during cooking. I haven’t been able to get any firm data on the migration of plastic materials from bags and plastic wraps into food, but I’m fairly certain that at least a small amount of migration is likely to occur. Whether or not that degree of migration is harmful is up for debate.
Many people are currently worried about the plasticizer Bisphenol A (BPA). Here is what the US government has to say about it. BPA is used primarily in polycarbonate. While we don’t wrap foods in polycarbonate, low temperature cooking is often done in polycarbonate containers (eg Lexans or Cambros).
Polyvinyl Chloride, another commonly used kitchen plastic , contains a whole mess of plasticizers –usually a group of chemicals called phthalates. As far as the PVC industry is concerned, phthalates cause tumors in rodents but not in primates –even in larger than normal doses. Other people are not so sure. Who knows? Many commercial plastic wraps are made of PVC. Often, these wraps smell bad –indicative of residual solvents and whatever is was used to make them. Aside from any purported health issues, bad smelling plastic wrap can most definitely make your food taste bad. Fatty foods like cheese are more likely to pick up bad odors from plastic wrap. Don’t use plastic wrap that smells bad. On the positive side, PVC is a pretty good vapor and moisture barrier and can have pretty good heat resistance.
Polyethylene, in its many guises, is another major plastic used to wrap foods. Most supermarket plastic wrap is made from polyethylene (PE). Polyethylene is usually plasticizer free –which is good news. Polyethylene wraps usually have some chemicals added to increase cling –often ethyl vinyl acetate (EVA) and polybutene (PIB). I haven’t found any health concerns on these two ingredients. The bad news about polyethylene is that it doesn’t tolerate very high temperatures and it is not a very good gas barrier. Plastic wrap is an especially bad gas barrier because it is made from low density polyethylene (LDPE). Food wrapped in LDPE will still oxidize. Odors might also be able to penetrate LDPE. Use several layers. Ziploc bags, as far as I can determine, are usually made of polyethylene. The freezer Ziplocs are better gas barriers than standard Ziplocs, both of which seem better than plastic wrap. Perhaps Ziplocs are just thicker than plastic wrap, maybe they contain some other type of polyethylene. I don’t know.
Ziploc bags are excellent cook-chill tools. At the school we always call out Ziploc, rather than re-sealable bags, because many off-brands don’t work. The seals fail, the bags come apart when cooking, etc. Do not purchase the Ziploc with the sliding do-dad. Get the regular double-seal type. We buy the freezer storage bags because they are supposed to act as a better vapor barrier than the regular type, and they are rated for re-heating in the microwave. We stock quart and gallon size bags. If you learn the proper technique for bagging, Ziploc bags can get almost as tight as a vacuumed bag.
The Technique:
- Fill a container with water deep enough to easily submerge your food and bag.
- Always add some sort of liquid to the bag –fat, stock, sauce, etc. The liquid is necessary to fill the gaps around your food and expel the air from the bag.
- Add your food item. A significant advantage of Ziplocs over vacuum bags is that the food can be added to the bag hot. All vacuum bagging procedures require your food to be cold (more on that in the upcoming vacuum section of the primer). If you are searing meat and adding it directly to the Ziploc bag make sure the surface of the meat is below 100ËšC (212ËšF) or the bag will melt. Be especially careful to not touch the bag with a hot set of tongs or spatula.
- Close the seal of the bag almost to the edge, leaving the last portion of the seal open –make sure you have correctly sealed the bag. Put your finger in the corner to make sure that part of the seal is open.
- Carefully immerse the bag in the water starting with the closed corner, not the open one. Make sure you do this step carefully, allowing air to escape up and out of the open corner.
- Just as the open part of the seal is about to go under the water, close it up.
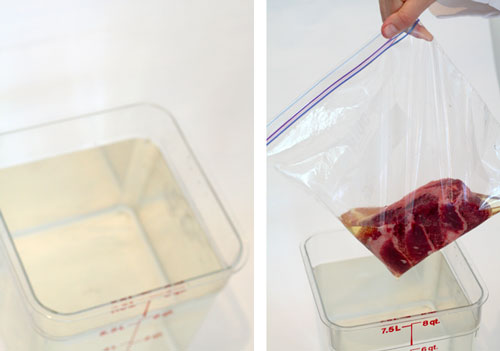
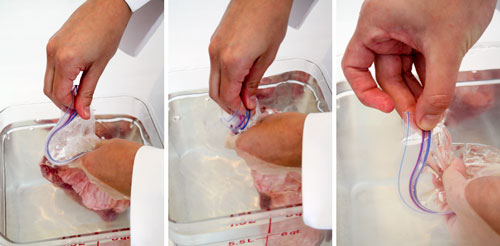
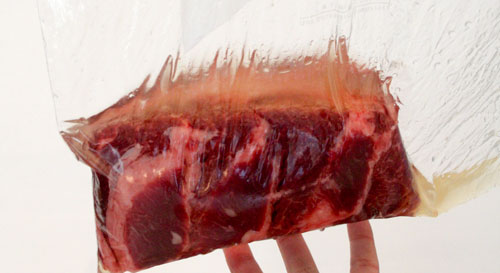
The advantages of the Ziploc are:
- you don’t need to buy a vacuum
- food can be bagged hot
- food can be removed from the bag and re-bagged easily
- the process is very gentle on foods and doesn’t change food textures the way vacuum bagging can
- it’s just as effective for cooking as vacuum bagging for most items
The disadvantages of the Ziploc are:
- not as convenient for bagging a lot of items as the vacuum machine
- Ziplocs cost more than vacuum bags
- doesn’t provide some vacuum benefits –fast marination, extended storage, oxygen removal.
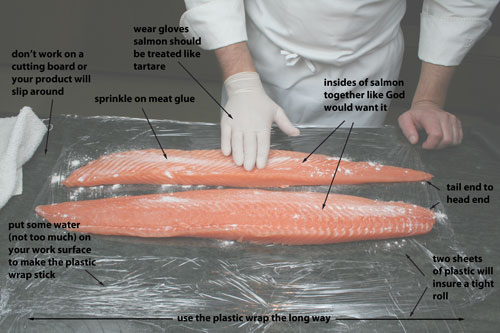
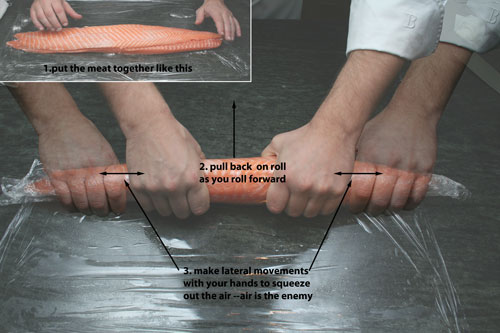
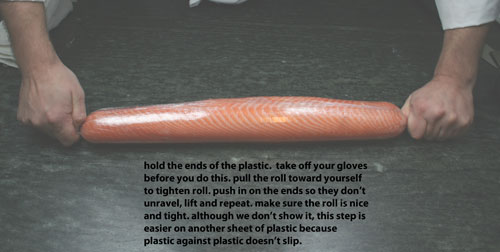
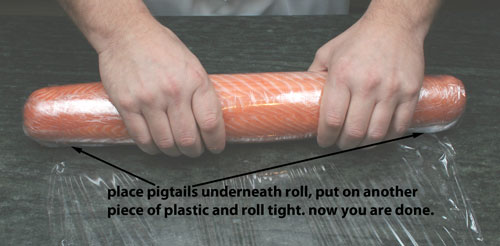
Rolling foods in plastic wrap is an excellent preparation technique for low temperature cooking. Rolls cook evenly and are easy to portion. We often combine rolling with some meat glue (see the transglutaminase primer). Properly rolled roulades in plastic wrap will not allow water to penetrate. Really good rolls are dense –they will sink. Here is the technique in pictures, borrowed from our transglutaminase primer. Remember –making good rolls isn’t as easy as it looks.
Another option for plastic wrapping: the cannon ball. Place the food to be cooked in a square of plastic wrap and twist to form a ball. Tie up the loose end. The part of the cannonball near this loose end isn’t going to be very pretty –serve it face down on the plate.
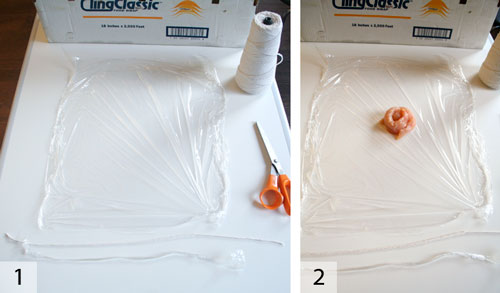
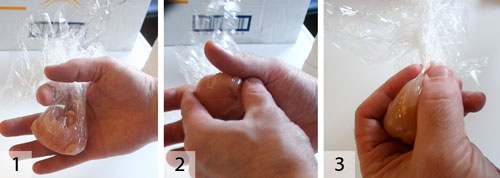
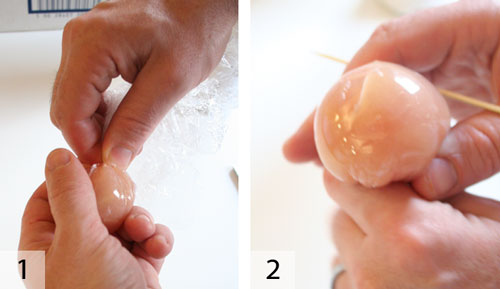
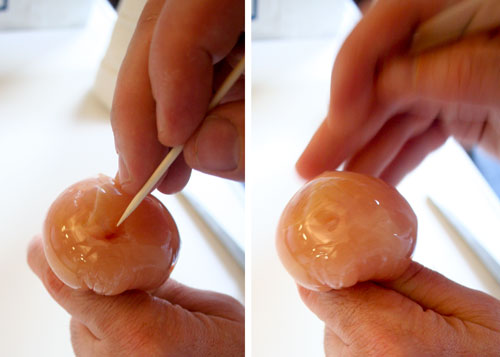
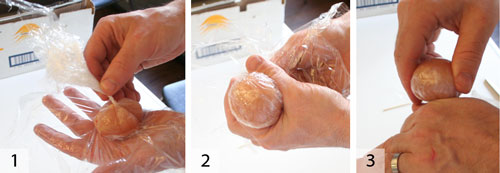
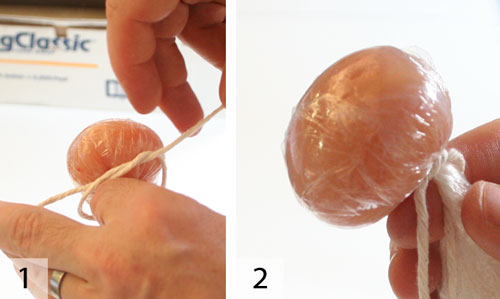
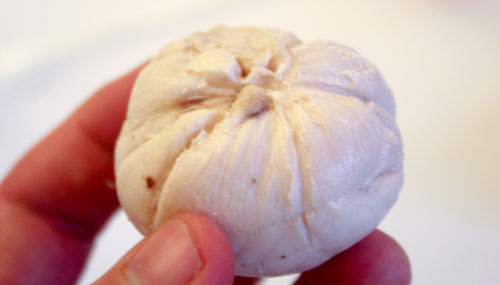
Whenever you use plastic wrap, use a brand that doesn’t smell bad. If you are worried about phthalates, use polyethylene instead of PVC.

Interesting for me the home cook. I’ll be back. I just bought some cold-pressed poppy seed oil and the seller suggested cooking my fish with it IF I cook at under 100° C – otherwise it kills the oil flavor. I’ve looked all around but can’t find specific info on what to do for this in my home oven. The seller said it is simply a matter of cooking it long enough. Is that a safe assumption?
Hi Sharon,
i would do a test of the oil to see if it is really destroyed by heating. Heat some in a pan, let it cool, and taste it side by side on something neutral like bread. As for fish, most fish shouldn’t be cooked at a low temperature for a long time because of mushiness problems –so a lot depends on the exact recipe you are trying to create.
I’ve been cooking sous vide and using the ziploc bag technique you mention. I have not been getting the strong flavor infusion that is often mentioned as a benefit of sous vide. Is this due to a lack of vacuum? If so, will a home vacuum sealer provide the effect or do I really need a chamber sealer to achieve it?
I asked this question over here: http://cooking.stackexchange.com/questions/2836/how-do-i-impart-extra-flavor-with-sous-vide-cooking/2861#2861
A great new site if you haven’t checked it out yet.
Hi Tim,
Typically, the vacuum will give more flavor penetration than a ziploc. The ziploc, however, will hel flavor in the sense that it prevents the loss of volatiles. A home vacuum can help with infusion in the sense of accelerating the penetration of marinades, but isn’t so good at infusion in the sense of rapid pickling and the like –that requires the real machine. Give me some more specifics.
I think that probably answers my question. I’ve done things like include rosemary and olive oil with lamb. The recipe said to be careful and use less rosemary than usual because of the strong flavor it would impart. I used a decent amount of it, but got almost no flavor of it in the final dish.
DA, I want to buy an immersion circulator more than my asthma meds. What do you think about buying one off ebay that was used in a lab? Same cleaning process as above?
Big ups.
Howdy Rusty,
You need to clean them very well and they often break (because of long heavy usage). I did something on the topic (I think) last week on Cooking Issues Radio. If you have trouble finding the segment I’ll link to it.
Interesting thread. When is the next instalment?
Soon, I hope.
When’s the next installment? 🙂
Also, please please PLEASE do something about the spam on the forums. 🙁
Thanks Caleb. I’ll look into the spam.
I have been low temp cooking in a slow cooker plugged into a PID but not using the cooker as a water bath. I have braised/stewed using this method English style short ribs, browned before putting them in the slow cooker and adding all the usual liquids, aromatics, seasonings one normally adds and cooking the ribs at 150 *F for about 18 hours. At the end of the cooking time, the cooking liquid is defatted and reduced by 1/2, thickened if necessary and returned to 130 *F with ribs and any desired and preprepared garnish added. The results are mindblowing. The meat keeps it’s shape, is meltingly tender and the bones slide out without effort AND it does not require my constant attention.
Nice. I haven’t done a lot of work with slow-cooker conversions, but I think it is an interesting area. The results I’m sure, are different from those done in a bag. I’d be curious to do a side-by-side.
Hello: I just found your blog and love it. I’m going to start listening to your radio show.
I am cooking eggs in a low-temperature water bath and using a thermocouple and PID to regulate the temp. I am getting a consistent read of 62.5-63.2 degrees.
I might be misunderstanding things but I thought that I could leave the eggs in the bath for several hours and still have the same consistency as an egg left in for 1 hour.
I’m seeing eggs that look like 67-72 Degree eggs and the longer I leave the egg the more done it gets.
Is there a time limit on how long to keep food in a low-temperature cooking bath.
Thanks!
Hi Rich,
Thanks for the kind words. In fact eggs do continue to cook after 1 hour, albeit slowly. we recommend dropping the temperature of the bath at least 2 degrees C to hold eggs for long periods of time. To cook an egg to 62 C you should cook for 45 minutes (the yolk will be runny). To cook an eggs to 63 (creamy) or 64 (barely set), you should cook for 1 hour. If the eggs are really packed together you can cook for 1 hour 15 minutes.
Thanks so much! I’m so enthralled by all of this. I’m 1/2 Amish and 1/2 techno- geek and this site makes me feel at home!
I’m going to be in NYC this coming week. Does the French Culinary Institute offer tours?
Shoot Rich, Missed this comment. Yes we offer tours. Stop on by. I also have family from Penn-Dutch roots (but not Amish).
Love your website. Your experiments have kept me entertained and had me change my way of cooking a few times. (e.g. steak flipping & watching the pressure cooker to minimize released steam).
One thing that concerns me is your advice to not replicate sous-vide methods in a home oven, understandably so because dry air is a poor conductor indeed. The part that I do not understand is the evaporative cooling at the surface. In that case, I imagine the interior of the meat would cook through?
In sous-vide cooking, people generally tend to sear meat to get a crust. I’m guessing that in the case of oven-cooking, the sear is actually necessary to cook the surface? I ask this because Heston Blumenthal advises cooking roast chicken and turkey in the oven at 60C. Is his method safe, or is it possible that he may not have considered evaporative cooling?
If the searing takes care of the problem, would a low-temperature convection be more effective? I imagine the increased thermal energy from the fan would allow the meat to cook quicker, albeit considerably slower than water. Personally, I would opt to push it by a few degrees since thermometers can miss the mark and ovens are terrible at maintaining a steady temperature. Apologies for the onslaught of questions.
Howdy Raphael,
I don’t advise cooking low temp in an oven because the evaporative cooling makes the technique inherently inaccurate. In a bag, your ultimate accuracy might be ok, but your energy transfer will still be bad in plain (or even convected) air. The searing is good from a safety point (kills bacteria) and from a flavor point (creates a crust that can’t be created at low temperature), but doesn’t help achieve the proper internal cooking temp. You could, if you knew exactly what was going on, probably figure out exactly how much of a temperature delta you were getting from evap coolinng, but cooking would still take a long, long time. Another option would be to put a pan of water at the bottom of the oven. Assuming your oven is heated from below this might mean that the water was always heated first and you might be able to generate a 100 humidity environment, speeding up cooking and evening out the evap problem (if you closed the vents of the oven.
What are your thoughts on the “Beer Can Chicken” in Modernist Cuisine? I don’t recall the exact cooking temp, but it’s very low.
I don’t have a copy of the book yet and don’t remember the recipe. Is it the standard beer can chicken?
Well… it involves a chicken and a beer can. Which by MC’s standards means it’s pretty standard :). They have you set your oven as low as it goes (the recipe specifies 80°C/175°F and cook a whole chicken to a core temperature of 60°C (3-4 hours according to the recipe), then blast your oven as high as it will go to crisp the skin (there are a number of other steps in there of course, but that’s the gist of it).
Howdy,
My guess is that hey go as low as possible to get the bird up to 60, which is underdone to my taste (more accurately, my eye), and then get the last couple of degrees (up to 63 or 64) during the blasting phase. I would also guess that the primary function of the beer can is to open the bird up and give the legs a place to go so that everything cooks more evenly and rapidly. The MC guys hate trussing as much as I do. I think chicken is best cooked a little shorter –but this may not be possible given the poor heat transfer in an oven.
Hi,
I’ve seen low temp cooking on TV a couple of times and thought it interesting, bringing to mind the trick of keeping poached eggs warm and with liquid yolk forever by controlling the bath temp. Then a good friend ordered a bath for home to try, and I immediately thought of a crock pot and PID controller. From the previous posts, I’m not the first to think of this.
I’ve got to try a steak+Ziplock+Crockpot+PID then finish it up in a furnace at 1500F for a bit. (Doesn’t everyone have a furnace?)
Here’s a furnace recipe:
1 bar O1 tool steel 1/8″ X 2″ X 18″
Shape as desired
Bake, or soak in a bath of molten salt at 1510F for 1 Hr.
Quench in any convenient oil.
Hold over Liquid Nitrogen for 1 Hr.
Bake at 400F 1 Hr.
Affix scales and sharpen your new carbon steel knife.
Great site. Thanks.
How did the furnace work? I once used a tunnel heater at 1750 F. The chicken heart I put into it instantly caught on fire.
Hi Dave, I’m currently a Culinary Arts student in Ireland. Our curriculum follows on set out by FCI. I’ve only recently been following your blog but find it entirely inspiring! We’ve recently covered sous-vide in our practical work and this blog has greatly assisted me in understanding the fundamentals and developing my own sense for operating. Many thanks for the effort you put into your replies and the wisdom you impart!
Thank you Sorcha for the kind words.
hey dave, any thoughts on cooking a pheasant sous vide, was planning on cooking it whole in waterbath and finishing it in an oven to crisp up the skin. any tips on time and temperature would be appreciated, also would you recomend brinning the bird first? thanks
Sorry, comment got put in wrong place.
Pheasant: 56-58 C for 45 min whould work on breast. Leg I’m not sure –I’d have to test. Brine for flavor only. Don’t vac too hard.
Hi Dave:
This site is fantastic, thank you for being willing to share so much information. Just curious as to when the other sections of this primer might be up? I recently bought an immersion circulator and have been using the bag technique in this section with a lot of success, but I’m also thinking of buying a home vacuum sealer, so I’m looking forward to any tips that might be included in the next sections.
Again, thanks for sharing so much knowledge!
Hopefully soon.What sealer are you looking at?
I’m having trouble with that actually, as the reviews of common brands seem to be all over the place. The Weston 65-0201 seems to be the best for a non-chamber vac, but it’s expensive and I’m hoping to spend less than that having just bought the circulator itself. The Caso VC 200 on the Williams-Sonoma site has gotten pretty favorable reviews, but several reviews indicate that it does not create a strong and reliable seal. The FoodSaver V2440 also has positive reviews, but the negative reviews also focus on problems with the sealer. I’m probably leaning toward the Caso VC at this point.
Do you have any recommendations for something that’s not a chamber vac?
I wish I had anything good to say Andrew,
I typicall use Ziploc bags at home. The only time I wish I had a non-chamber vac is for bagging dry goods and cooking veggies (ziploc doesn’t like high temperatures and inflates too much).
This actually brings me to another question. You mention in the primer that one advantage to vacuum over Ziploc bags is quick marination & deeper infusion of flavors. I’d guess you can’t use a non-chamber vacs with liquid, but would it work to freeze the liquid or marinade, then put it in the bag while hard and let it thaw? Maybe put it in a low-temp water bath so it thaws more quickly but doesn’t actually cook anything? Shouldn’t it be the case that once the air is out and the marinade is liquid again that it would marinate more quickly?
Hello Andrew,
I know people who put frozen sauce in foodsaver bags, but I don’t know if it actually helps with marination. I have never run the tests.
Dave, have you used a CVap Hold & Serve as a Cook & Hold? I am wondering if I could use a single drawer unit in my home, and do dishes similar to what Wylie & Zak demo on the Starchef website.
Howdy Sonso,
I know I’d like a single drawer unit in my home.
Thank you a lot for providing individuals with such a nice chance to check tips from this blog. It is often so nice and packed with a lot of fun for me personally and my office fellow workers to visit your web site at minimum three times a week to study the fresh guidance you have. Not to mention, I am certainly impressed concerning the impressive solutions you give. Certain 3 ideas in this post are absolutely the most efficient I’ve ever had.
Thanks so much.
Dave, thanks for such an excellent primer on low temperature cooking.
I am lucky to have an convection oven at home capable of holding very low temperatures ( ive tested it as low as 140f)
I was wondering about using this oven to cook meat for long periods of time at a low temperature (148f or less). If I were to simply add a pan of water to the bottom of the oven and place meat wrapped in plastic or in a ziplock bag on the rack, would this be a viable approximation of a c-vap?
I was thinking of using it to cook a goat leg.
Thanks!
Hello Matthew,
To approximate a cvap you could use your oven if you put an immersion heater in the pan of water and controlled its temperature with a thermocouple and pid controller (or similar). The whole apparatus could be built for roughly 100 bucks. You do need to control both the water temp and the box temp, however.
Thanks for the rapid response Dave!
This seems like an interesting solution for a pretty small price.
Im assuming using a normal (dry) convection oven at very low temperatures is a bad idea, as the heat would not circulate properly as in a cvap. Is this the case?
Correct.
Hi Dave, thanks for sharing. I’ve just recently gotten into low-temp cooking, and have found your articles informative and inspiring.
One question that I have pertains to something that you said that you’d cover in the next article, but because i’m hoping to rectify my ‘bad habits’, if you dont mind i’ll ask it here.
I have been vac-sealing ‘warm-hot’ food with my domestic sealer. Can you please explain why doing that is wrong?
Thanks again.
Howdy Les,
If your machine can suck enough of a vacuum to boil the water in your product at elevated temperatures, you run the risk of destroying the texture of delicate items like fish. Also, the absolute vacuum you can pull will be limited to the vapor pressure of water at the temperature of your food.
food saver good function ,You do need to control both the water temp and the box temp,I am certainly impressed concerning the impressive solutions you give.
I am cooking sous vide in bags…Is it safe cook meat for a long time (12 hrs) and then to empty out the liquid (blood) reseal and continue cooking?
Sure ttellez, but you need to chill the meat before re-bagging. Not sure what would happen to texture/etc. Let me know.