posted by Dave Arnold
Here is a recap of what we know about cooking turkeys:
- The breast meat should be cooked to 64 or 65 degrees C.
- The leg meat should be cooked no lower than 65 degrees C.
- The longer you cook turkey meat, the worse it gets.
- The turkey should be served whole. We Americans want our turkeys to look like turkey. No tube shaped birds (sorry Nils). No carved up pieces.
- Don’t vacuum the whole turkey because the bones will make the meat unappetizingly pink.
For the full story see our post here.
My turkey this year will be low-temperature cooked, cooled, and brought to my in-laws’ house for finishing off. I divided the problem into two parts — cooking and finishing–and tried to find the best solution to each.
Problem 1: Cooking the Turkey
We needed to figure out a way to cook the whole turkey in 2-3 hours. Since turkeys are big, expensive and in short supply at the FCI,  I ran feasibility tests on chickens.
Idea 1: Flay the bird, cook it flat, and reassemble it around a skeleton.
The bird cooked quickly and properly but the reassembly idea didn’t work at all. It looked bad, and I got burned.

Idea 2: Two-part cooking –the double-dippin’ chicken.
The inside of the thighs are the hardest part of a bird to cook. The bird is thickest there, so it takes the longest to heat. Even worse, that part of the bird needs to cook to a higher temperature than the breast does. We investigated a two-temperature, two-time cooking technique.  We set a circulator full of oil to 65 .5 degrees C and suspended a chicken in the oil so that just the legs would be cooked. After 1 hour we lowered the temperature of the oil to 64C and submerged the whole bird. The legs would be cooked longer than is ideal with this technique ( for a turkey the legs would cook for 3-4 hours) , but the texture of dark meat is less affected by long cooking times than the breast.

Surprisingly, when we cut the bird open the thigh meat was still pink. WTF? My guess is that the meat around the thigh doesn’t look right if it is cooked too slowly. Myoglobin is the pigment that makes meat pink. Myogloblin keeps its red color if it is heated slowly. Low and gentle is good for texture, but not for color. We needed a more sophisticated technique that would cook the meat inside the thigh quickly.
Idea 3: The bionic chicken.
Concept: cook the bird from the inside-out. Bone the bird, replace the leg bones with aluminum tubes, stuff the carcass with aluminum foil (heats quickly, maintains structure), and pump hot oil through the tubes to cook the inside of the thigh quickly.
The test: first, bone the bird. We used a technique that avoids cutting the skin: Starting at the butt end of the bird you carefully remove the bones by slowly turning the bird inside out. Then you carefully remove the leg bones; the wing bones are left in. It was our intern Ed’s last day (he graduated today) so we gave him the honor of performing the boning.

Next, cut pieces of aluminum tubing to the same length as the leg and thigh bones. We cut slits all along the tubes so they would act like sprinklers. We made the knee joint by joining the tubes with rubber tubing. We attached these bionic leg bones to the pump output of an immersion circulator.  Witness the legs being tested with water:

We stuffed the inside of the chicken with aluminum foil and threaded the aluminim tubes into the legs. Then we trussed the bird — no one would suspect a thing. We put the bird on a cooling rack over a lexan full of oil heated to 65 C with an immersion circulator. We hooked up a second circulator and used it to pump hot oil through the leg tubes. The extra oil poured out of the bird and back into the lexan. After 20 minutes we lowered the temperature to 64C and dropped the bird into the oil. 40 minutes later we pulled it.

The bird held its shape even when we removed the foil. It looked like a whole, untouched bird. The meat was perfect all the way through.

We had our technique.
Problem 2 Finishing the Turkey:
Clearly, flash frying would be the best way to finish the turkey – but the turkey I have is too big to fry whole. It won’t fit in a standard turkey fryer, and I don’t want a reputation for ruining Thanksgiving at both my in laws’ house AND my mom’s house. So how about a torch?
The Problem with Torches:
Nils and I don’t like to finish meats with a torch.  They don’t taste right. Two theories for this. 1: You can taste the fuel and 2: the heat from a torch is too high. I figured out a solution to the first problem.
Torches don’t burn 100% of their propane. Some years ago I did an art piece where I battled a mechanical fire-breathing dragon (don’t ask). The dragon was a large, kerosene powered flame-thrower of my creation. I tested the flame several times, and I thought I could handle it, no problem.  But when I actually stood in front of the flame, something interesting happened. All of the kerosene that was moving too fast to be burned efficiently hit  my shield, slowed down, and caught on fire, creating a huge fireball. I got burned pretty badly.
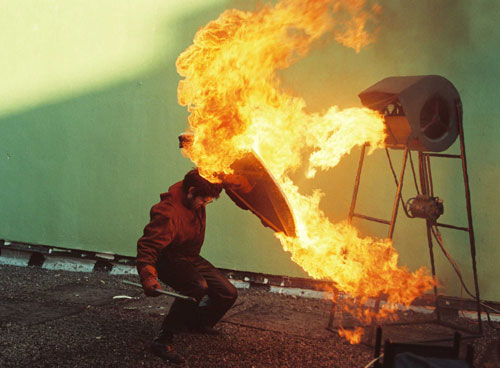
That was the last time my wife trusted me when I said xy or z idea if mine was “no problem.” But that experience gave me an idea about the torch. What if we put a piece of wire mesh between the torch and the bird? Maybe we could catch and combust the excess propane?
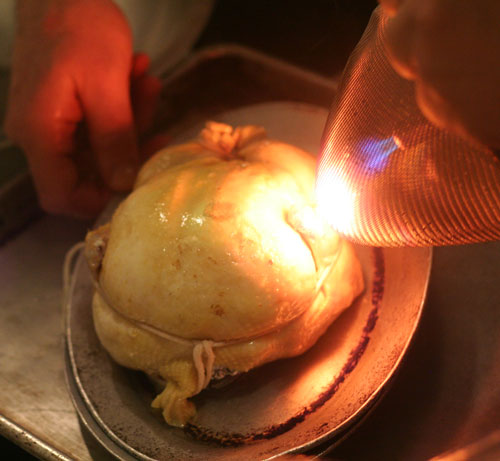
It worked! Propane taste gone. I was so happy I ordered a square of super high-temp nichrome wire mesh and a 500,000 btu roofing torch.
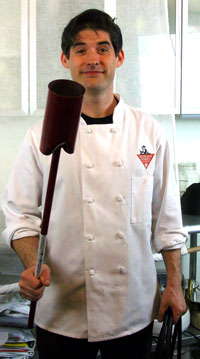
But……….

Propane taste isn’t the only problem with torches. The finish is spotty and, as my intern Fabulous pointed out, “The skin isn’t crispy.” I opened my mouth to give a counter-argument and he just repeated “not crispy.” Point taken. Plus, I don’t think the family would have appreciated the roofing torch.
Winning Technique: Pourover Frying:
Ladling hot oil over the skin for several minutes worked great. That’s what I’ll do. Simple.

Bionic Turkey:
We boned out the turkey and created the bionic leg bones.
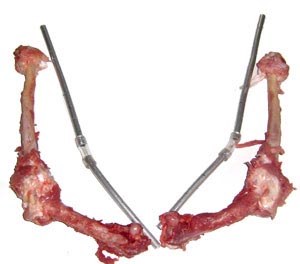
We salted the inside of the bird,stuffed it with herbs and aluminum foil, and installed the bionic legs.

We filled a pot with duck fat and butter and heated it up to 66 degrees C. We put the bird on a cooling rack over the pot, hooked up the legs, and turned on the pump.

The bird was too big so grease went everywhere. We MacGyvered it up.
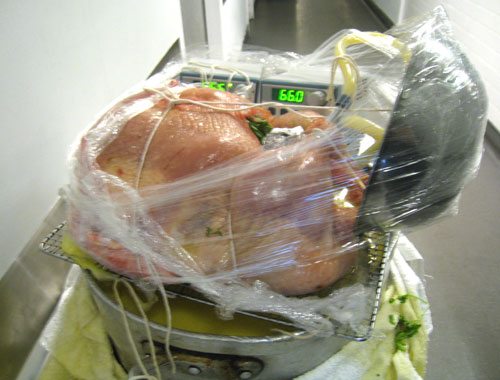
After an hour we lowered the circulators to 65 and dropped the bird into the oil for 1.5 hours.
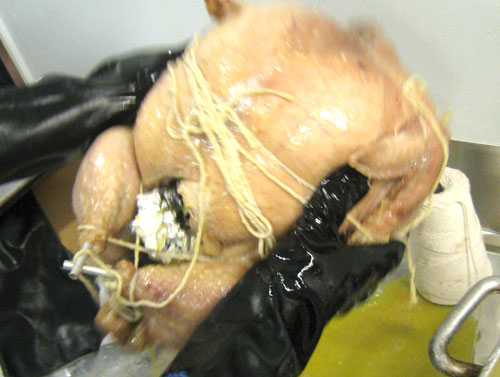
Then I threw the bird in the blast chiller for half an hour, packed it in ice, put it in a gym bag and caught a train to Connecticut. I’ll tell you how it turned out after the big day.

sounds like a lot of work, shoot me a message at
http://www.eatdrinkandroll.wordpress.com
And to think, we don’t even celebrate Thanksgiving over here!
I saw that roofing torch in use on some bitumen once. Have often fantasized about using it to speed-torch brulees.
I’m sure I’ll figure out some excuse to use it soon.
Gentlemen, We can rebuild it. We have the technology. We have the capability to build the world’s first bionic turkey… Better than it was before. Better, stronger, faster.
But seriously, your family better appreciate at least the effort this year if not the taste.
I hope so. Thanks.
Dave,
Chapeau, I must say this is really awe inspiring!
When I recommended two circulators set at different temperatures, I thought you would never do such a silly and complicated thing. It was meant half as a yoke.
Little could I know how wrong I was? You are the man! This is far out! Bionic turkey is ingenious.
I bet in a couple of year everybody will prepare his turkey this way LOL.
Two comments: fist of all I totally don’t get it with the metal mesh!
Do you know what a Davy lamp is?
http://en.wikipedia.org/wiki/Davy_lamp
This is designed so that a flame cannot go thru the metal mesh and ignite combustible gases outside the mesh.
The mesh thus is a very efficient flame stopper, so all the semi burned propane will stop burning at the mesh and go thru as some strange mixture of breakdown products (maybe some carboxylic acids or aldehydes or the like.) I doubt that unburned propane (unlike kerosene) will condense on the mesh.
I think you achieve the opposite of what you hypothesized: more unburned fuel on your chicken. But still it lost the fuel taste. So maybe the fuel taste was not from the fuel after all but from the high heat burning fat causing a fuel taste. With the mesh your stream of hot gases is considerably cooler and wont burn the fat. Voila you solved that problem but following a wrong idea, that’s serendipity.
Now unfortunately the hot gasses aren’t controllable well enough for roasting. Have you ever tried a heat gun (for removing paint) this can give you 650°C hot air, should be enough and better to control.
The pour over frying is cool but strangely low tec! Have you ever tried a peristaltic pump with a silicone tube pumping 180°C fat? This would give you a nice controllable flow of oil you could direct selectively to any body part you like (of the bird).
Keep it rocking,
Schinderhannes
Howdy Schinderhannes,
Thanks for the kind words. I didn’t know about the Davy lamp. Cool stuff. I have used heat guns quite a bit. In fact, I have a butane soldering iron with a ceramic mesh attachment that allows me to convert it to a heat gun. That was part of my inspiration for the chinois/torch combo. When I get back to the FCI I’ll have to run down the actual mechanism for the elimination of torch taste. There appears to be a second fire on the other side of the mesh. Perhaps if the mesh is above the ignition point of propane it ignites excess propane on the other side? Could it be that this method combusts otherwise unreacted ethyl mercaptan (the odorant added to propane so we can tell if it is leaking)? I would love to get some propane that was ethyl mercaptan free to test.
Since you are really adventerous and love to burn yourself, plus seem to be a boozy person (strictly from a professional perspective).
I´d recommend as a control some EtOH driven flame. You could by some kind of white fuel coleman stove (or an MSR whisperlite), (needs to be virgin, never seen no kerosene).
Geer it up to use EtOH instead, (all you really need is the evaorator/super heater tube going thru the flame with the booze prior to combustion.
Properly rigged up this could either create a very clean flame or kill you.
I´d say worth the risk
you crazy crazy man hehehe… loads of work… hope the results are outstanding and worth it…
by the way, your mechanical fire-breathing dragon photo rocks!
happy thanksgiving man…
Is that the photo hanging at momo milk bar?
Yes
Lol! This is great Posts like this are why I read this blog!! It’s like a combination of Red Green and Tim Taylor (to quote two 90’s tv shows) mashed together in a cooking lab!
I have to find a youtube clip of Red Green cooking his Thanksgiving dinner with different parts of his car on the road to visit his family.
Hysterical culinary adventure. I am happy the journey ended with a perfectly done turkey and family that still speak to you. How about a super low-tech version of the original salamander (circular iron that was heated in a fireplace) to crisp your skin. There are even plug in version of this device I have seen used in France. Great ideas and very well documented. Thanks.
Any developments on eliminating torch flavor yet? I am avidly watching this space.
Some people swear that butane torches taste better than propane but I can’t say I’ve found that.
Howdy Paul,
Yeah, we’ve done some more work on the problem but not enough to write a post on it. Briefly, both propane and butane are tasteless and odorless but are doped with a crappy smelling compound so you know if it is leaking. I believe the torch taste has to do with incomplete combustion of that added stinky stuff. I can get rid of the taste by putting a piece of nichrome wire mesh in front of the torch. I can also use a different type of propane torch that doesn’t have such a fast flame and it too doesn’t have the torch taste.
Theo Gray plays with mesh and propane:
http://www.popsci.com/diy/article/2009-12/gray-matter-built-lamp-doesnt-explode
Super-cool link Paul A.
Hey Dave, You can find my piece on your turkey at http://nyfoodchain.com/2009/12/21/food-inspires-personal-expression/. I loved your kombu blog post by the way.
Are there any prints from your St. George piece floating around somewhere? That photo is amazing!
Thanks Hanna,
The only one currently is in the back of Ssam bar. Maybe I’ll print more someday.