posted by Dave Arnold
As readers of this blog might know, I’m building my own rotovap. See here and here. If you don’t know from rotovaps, see here.
Here is the latest:
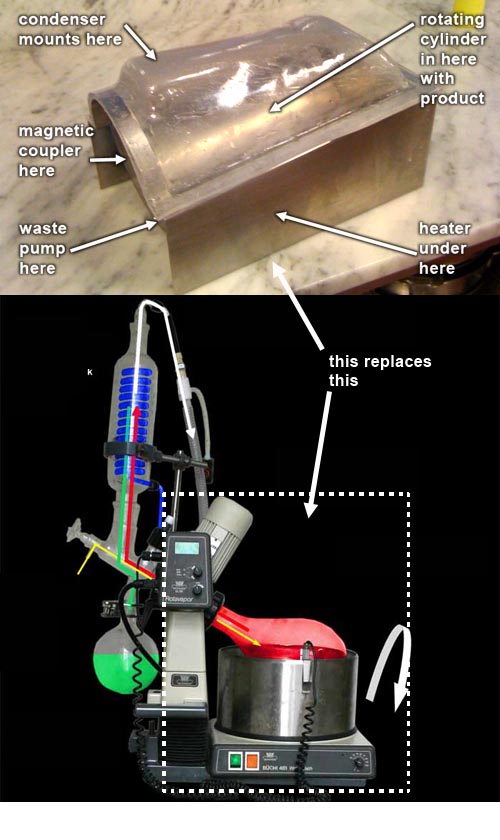
The new rotovap is designed without a rotating vacuum seal—one of the crappiest parts of the laboratory system. The liquid to be distilled will be sealed in a heated inclined stainless steel semi-cylinder with a semi-cylindrical PETG lid (PETG is an easy to work with, clear, alcohol resistant plastic). A polycarbonate cylinder inside will be rotated magnetically to provide the agitation and surface area needed for rotary evaporation. Here is my new rotovap base, and what it replaces:
The lid isn’t perfect, but here’s how I made it:
I’ve wanted to do vacuum forming since I was a kid; this was my first real foray. Vacuum forming is a simple technique: A sheet of hot, flexible thermoplastic is held in a rigid frame and forced to conform to a mold using the suction from a vacuum. Well made vacuum-formed products have good surface finish and structural qualities and can take complex shapes without the hassles of casting or machining. I knew the new rotovap lid had to be plastic so it would be both transparent and super strong; I knew that it should be curved to better withstand the forces of vacuum distillation. Vacuum forming seemed like the right process to get the job done. I had kinda vacuum-formed for my Mokume-Gane fish slicing technique, so I felt fairly confident in my abilities. Ha.
I started by reading some DIY web tutorials on vacuum forming like this one on the Instructables site. Making the form was the first step. I used blue Styrofoam because it is cheap, easy to cut, and it came recommended. I built a hot-wire foam cutter to help me:
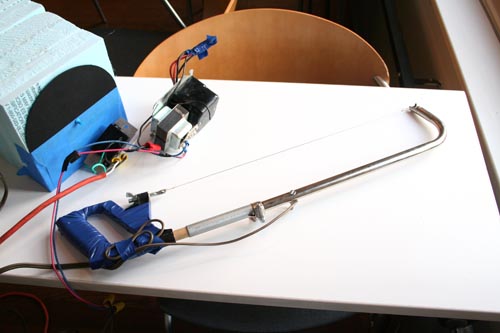
A hot-wire foam cutter is one of a long list of tools I’ve always wanted but can’t justify buying. The one I needed for this project costs $200 (too much) so I turned to the tech team’s scrap closet. I had some nichrome wire for the heating element (too thick really, but would do), an extension cord, an old transformer (couldn’t really handle the current I needed but would work long enough), a dimmer, a hacksaw, a hose clamp, a wooden dowel, some screws, and electrical tape. You can see how I rigged it in the picture above. Miraculously, it works. Turn on the dimmer till the wire starts singing, and cut away. Cardboard cutting guides (see the black half circle in the photo) help a lot. This thing would actually be a really nice tool if I invested 3 dollars in the right gauge of nichrome wire and found a beefier transformer.
After wire cutting, sanding, and puttying here is my form:
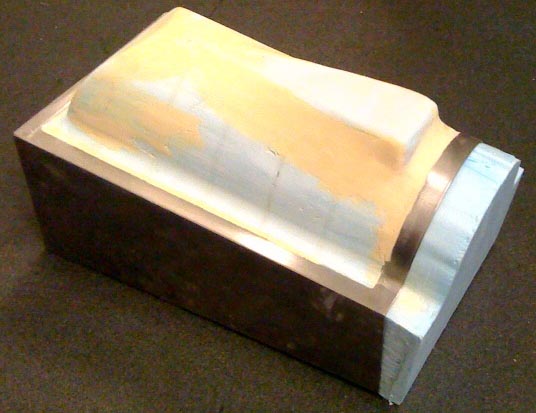
I would later learn that I made some major mistakes right out of the gate.  Turns out the PETG would pick up a lot of surface detail, and my mold wasn’t smooth enough. Styrofoam compresses a bit so I should have spackled over the whole thing with bondo to provide more rigidity. And a release agent to prevent the PETG from gluing to the form would have been a nice addition. But I’m getting ahead of myself…
The next step was building the forming table, typically just a flat surface with some perforation and a vacuum hooked up to it. But I didn’t want to use a flat table because the PETG would have to form over the whole base of the rotovap if I did. I built a forming box out of MDF instead, so the base of ‘vap would be covered. Next, I needed to connect the box to a vacuum source. Most people use shop vacs for suction.  I don’t have a shop vac, so I opted to use our Minipack vacuum sealer; it can suck more than enough cfm’s and provides a very high quality vacuum. One problem: The vacuum inlet of the Minipack is metric. Now… I’ve come to grips with cooking in Celsius. I’ve learned to accept the millimeter and the gram. But metric pipe fittings are the devil’s own work. They are weird and impossible to find in the US. I hate them. Instead of endlessly searching for the right fitting, I just molded some silicone onto a hose barb and jammed it into the vacuum inlet as an adapter. The last step was building a rigid frame to hold the plastic while it was being formed. This step turned out to be more critical than I thought. I used cut-up aluminum rulers and spring clamps for my frame, instead of the universally recommended aluminum window-screen extrusions (see the instructables site) because the local hardware stores didn’t have them. The PETG I was using was 1/4 inch, which is pretty damn thick. I should have used a tough frame. In retrospect, I doubt even the window screen stuff would have held up. But what I had was laughable.
I loaded the frame with plastic wrap, turned on the vacuum, and did a test pull. It was perfect. It sealed beautifully. Awesome. We clamped up the PETG, threw it in a 350°F convection oven, and waited for the plastic to slump, an indication that it’s soft enough to mold.
We turned on the vacuum and pulled the PETG out of the oven. It was hard to move that plastic around without getting burned. In fact, I burned myself pretty badly. Making matters worse, the aforementioned frame just disintegrated as my interns and I started to push down the PETG in our attempt to mold. The plastic was too thick and stiff and the frame too weak. A lot more force was required than I thought. A lot more. Burned and furious, I threw the PETG onto a sheet tray and back in the oven to soften more while I held both my wrists in ice water.
After another 5 minutes in the oven, we pulled the PETG out and quickly loosened it from the sheet tray with an offset spatula. The sheet looked pretty bad. It was mangled on the edges. Little bubbles had appeared where we had put grease to help the frame form a seal (hint: don’t use grease). I pretended this was all OK and pressed on. We tried to make the PETG seal over the mold by hand. Let’s just say it wasn’t working. The only thing redder than my burnt wrists was my screaming face. Then I had an idea: plastic wrap. I yelled for plastic wrap and the interns started covering our whole contraption with it. As the first layer went down, we could tell it was working. The PETG started to mold! Almost immediately we heard a suck and pop noise as the plastic wrap blew out under the suction. In unison, we all cried, “more plastic!” I have never witnessed such a feat of Spiderman-like wrapping. As fast as hands could move layer after layer of plastic wrap went over the mold. It was holding! Suddenly, the vacuum machine turned off at the end of its cycle (another eventuality I should have foreseen) and we scrambled to start it again.
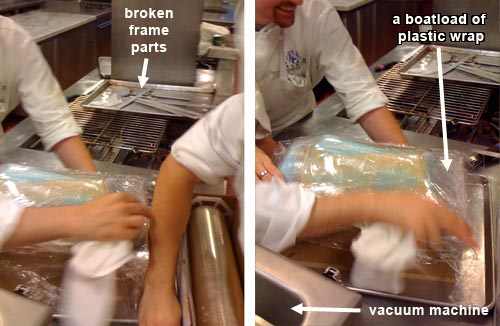
After three vacuum cycles, as someone was placing ice packs (also made of plastic wrap) on the mold to cool it off, another mishap: My hastily made silicone adapter got sucked into our vacuum sealer with a quick shluuump noise, quickly followed by some choice expletives from me. True, the worst was over, but we did have to disassemble the entire vacuum sealer to get the silicone out of the system.
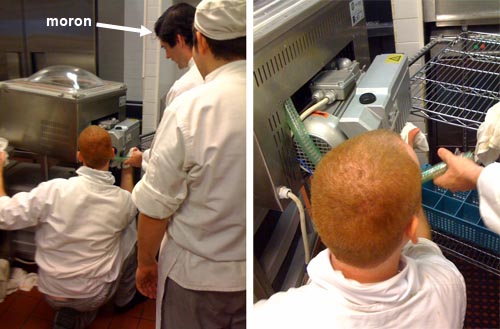
And our improvised vacuum forming process? It worked… sorta. The mold stuck like a demon to the PETG, but we eventually got it out. The surface isn’t so nice so I’ll have to sand and polish it. The plastic wrap welded itself to the PETG, so we have to figure out a way to get that off. But we have tested the lid and base, and they do hold a vacuum without crushing! I call that a win.

i envy you
ROFL! I love this 😛
This is awesome. I wonder about using it in a commercial kitchen, however: wouldn’t it be illegal to use in a commercial kitchen unless it was certified by some standards board or other?
Well… It is illegal anyway because of the distillation; but you bring up a good point. It definitely won’t have an NSF certification, but we are using food grade materials.
Hey Dave! Any news on this? are we mortals gonna be able to make our own aquavit anytime soon?? hehe
Howdy Patricio,
Soon I hope.
Hey, Dave… have been trying to get your attention (and that of Joe Zakowski and Maria Caruso over at Cuisinart) to see that the room temp distillation performed by my Centrifan PE could literally be a food processor attachment! This rotorvap effort for only the most finicky extraction jobs… Check out: http://youtu.be/6p2UGpZrx0A
Bert
Howdy Bert, Sorry for the late reply.
I’d like to taste some product out of it vs a rotovap. What is the max volume you can do at a time and how long does it take per liter?